Pandalism
Felix DMR's Blog
Programming, Electronics, Autonomous Vehicles and other interests!
Copyright © 2023 Pandalism
15 September 2020
After the other month’s adventures in just buying the cursed microserver, this is the collection of adventures in toiling away at getting it all working, and then selling it anyways.
Initial setup
Initial steps were as expected, turn on the device, update all the firmware and start installing the proper OS. This was all done through the embedded computer management system otherwise called the integrated Lights Out (iLO). It was one of the primary reasons I particularly wanted the HP Microserver.
This was progressing well, although the iLO interface was extremely sluggish and sometimes failed to sign in and then it hit me with a terrible sounding error:
Controller Firmware Revision 2.10.00: Embedded media manager failed initialisation
Turns out it was a simple bug in the iLO firmware, solved with an update and a NAND memory flush, as described here.
 Error message in question
OS
With that out of the way I reached the fork on the road where one debats on which OS and file system to install. To me the options were:
- Proxmox, virtualisation OS, with the very robust ZFS.
- FreeNAS, a NAS OS based on FreeBSD, also using ZFS.
- OpenMediaVault, another NAS OS but based on Debian, with the option to select ZFS or use the very popular combination of BtrFS/Ext4 and Mergerfs+Snapraid to provide similar redundancy.
I did end up installing all, and really they all had similar capabilities (just a matter of configuration and installation) but my familiarity with linux and the fact that this was meant to be a NAS in the end meant I stuck to OpenMediaVault. I do have to say another reason is the fact the community appeared to be much more supportive on the forums compared to FreeNAS and more YouTube tutorials existed for the former. I have no doubt that FreeNAS is a solid choice, and probably more robust and safe considering the FreeBSD base, but the slight tinge of arrogance and dismissive tones of the community stood out to me.
Upgrades
By now I had ordered a 128gb SSD to host the OS in the 5th internal SATA Port, along with the 16gb ECC memory and new CPU I bought, mentioned in the last blog. it was looking like quite a powerful little NAS Box. Setting up the server to boot from the 5th port did require some tweaking due to some interesting BIOS limitations, but with a ubuntu install on a separate USB stick and some GRUB modifications to select the right kernel and drive, it was booting into the SSD in no time.
With OpenMediaVault installed, first thing to do was get the omv-extras plugin, this gives access to various things from the community including the ZFS plugin and the snapraidfs and mergerfs plugins, which are vital to the next step, setting up the data drives!
To play around with ZFS first, I tried to install it, however I believe a dependency mismatch somewhere in the plugin was causing it to fail, reading through the forums, I installed the Proxmox Kernel first (found under the OMV-Extras entry), had to tweak my GRUB configuration to ensure it booted into the proxmox kernel (its the one that ends in -pve) and then installed the ZFS via the command line, following this guide, or also this guide. Once that was done, the plugin installed fine, and it appeared to work great on the sidebar.
mergerfs and snapraidfs were simple to install, just go to the plugins and select them (mind you the mergerfs plugin we want is actually called OpenMediaVault-unionfilesystems for some reason)
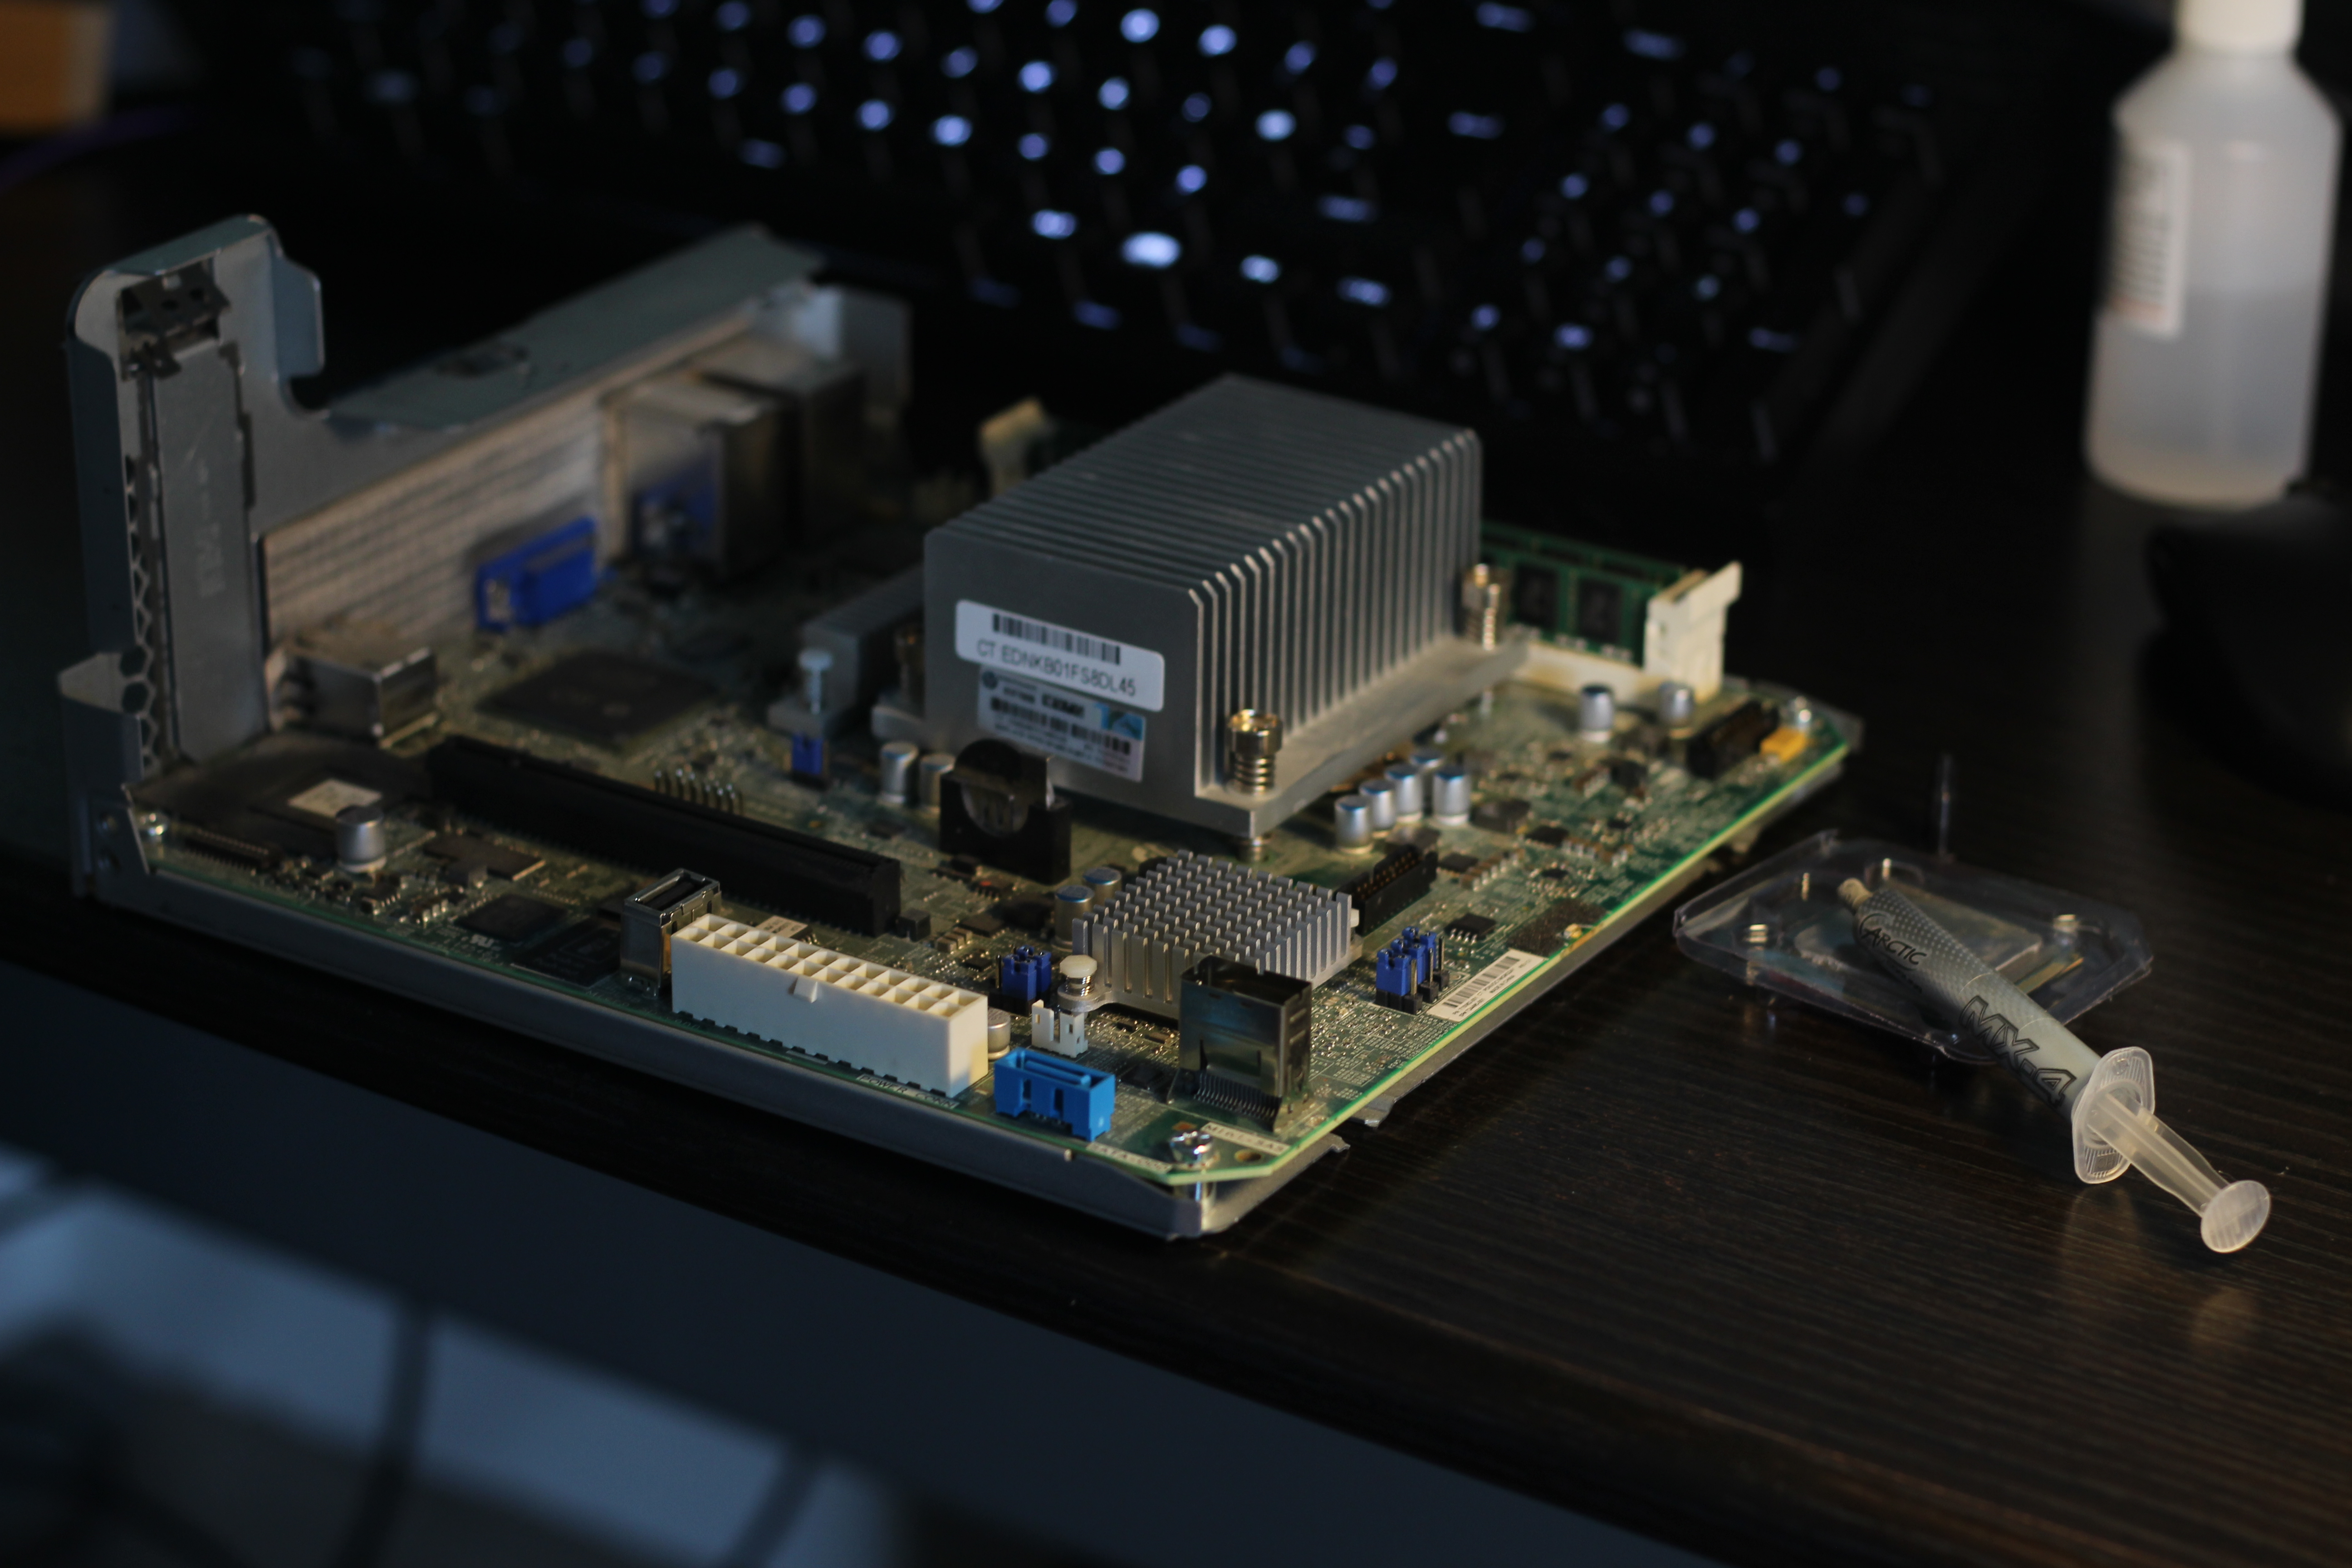
I ended up choosing snapraidfs and set up two 14tb drives in the server, drives shucked from WD Elements external harddrives which works just fine for me and ended up being half price compared to the very same drives they are based on.
 Success!
 Shucking the drives
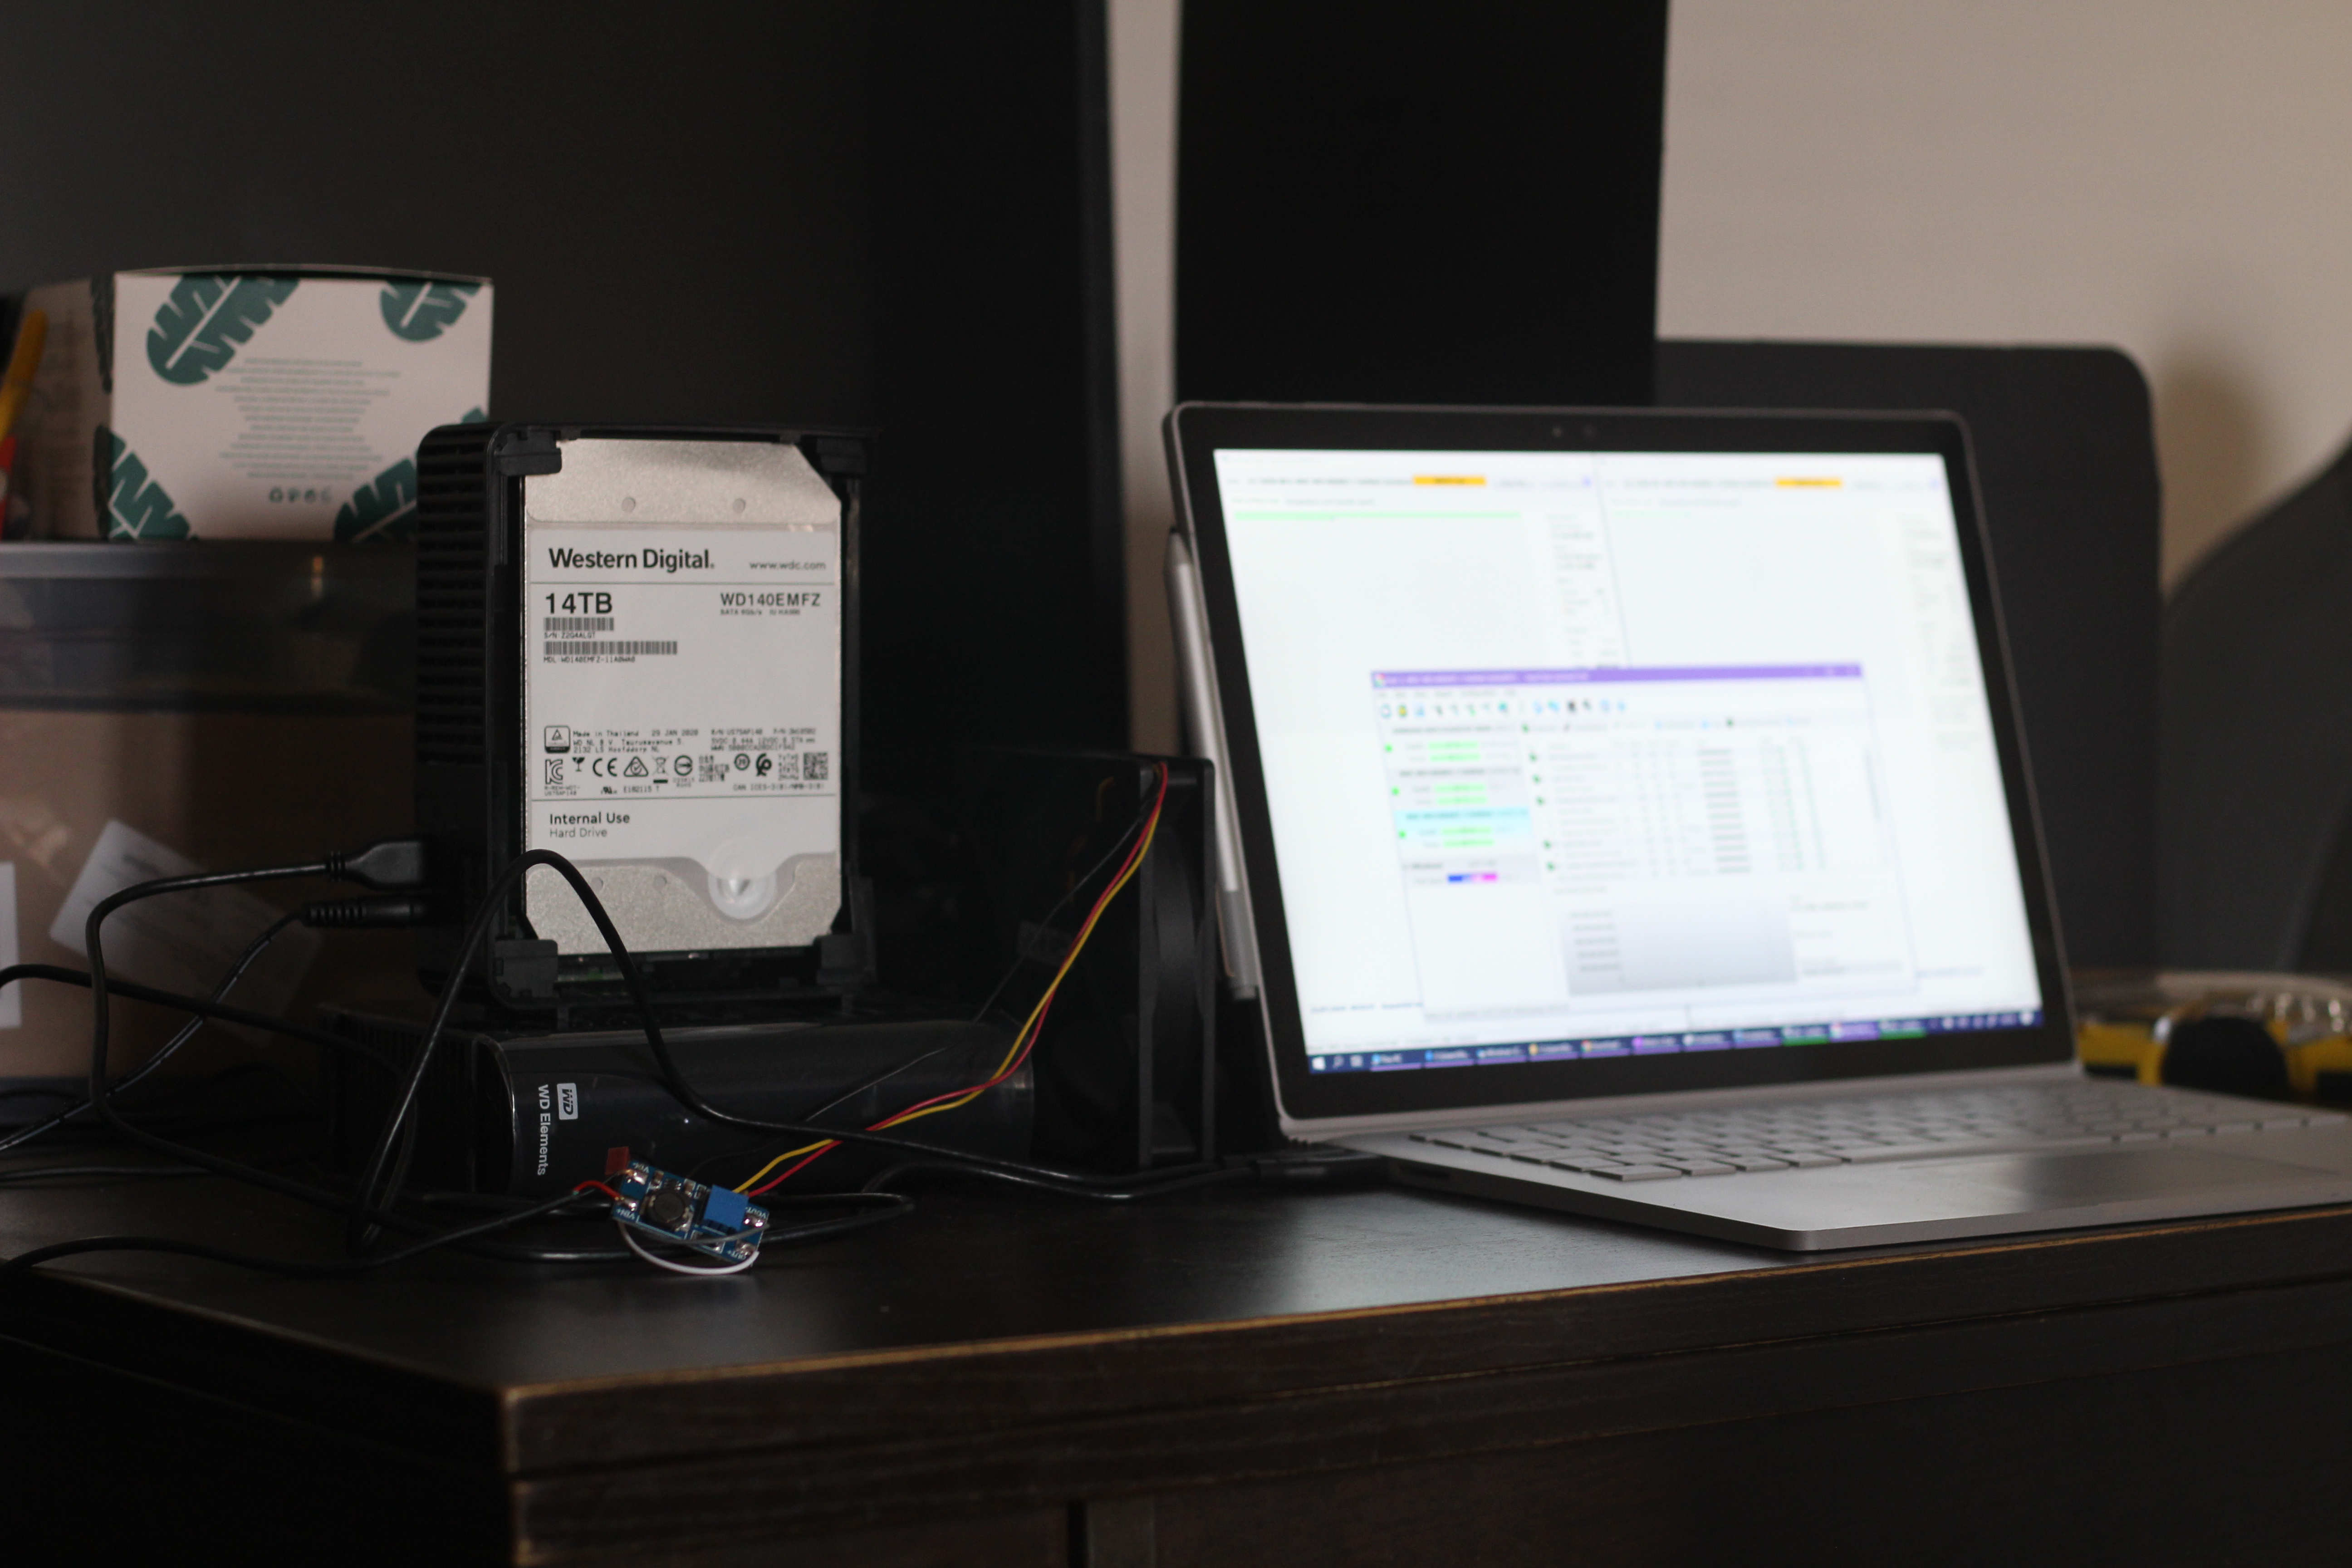 Testing shucked drives for bad sectors, note the fan!
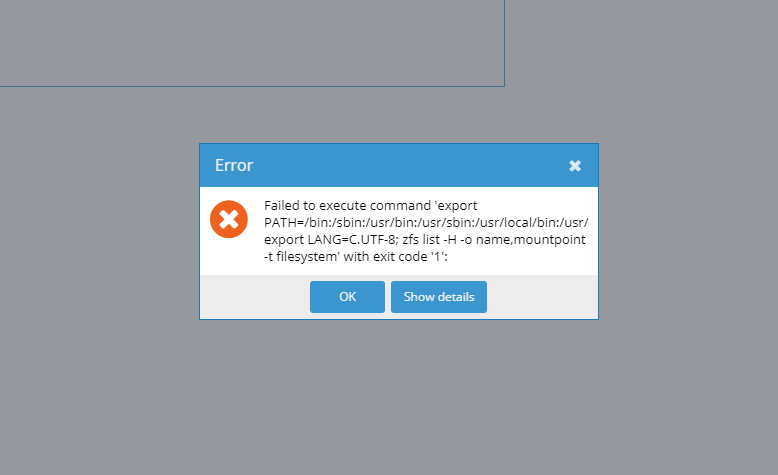 The previously mentioned ZFS error
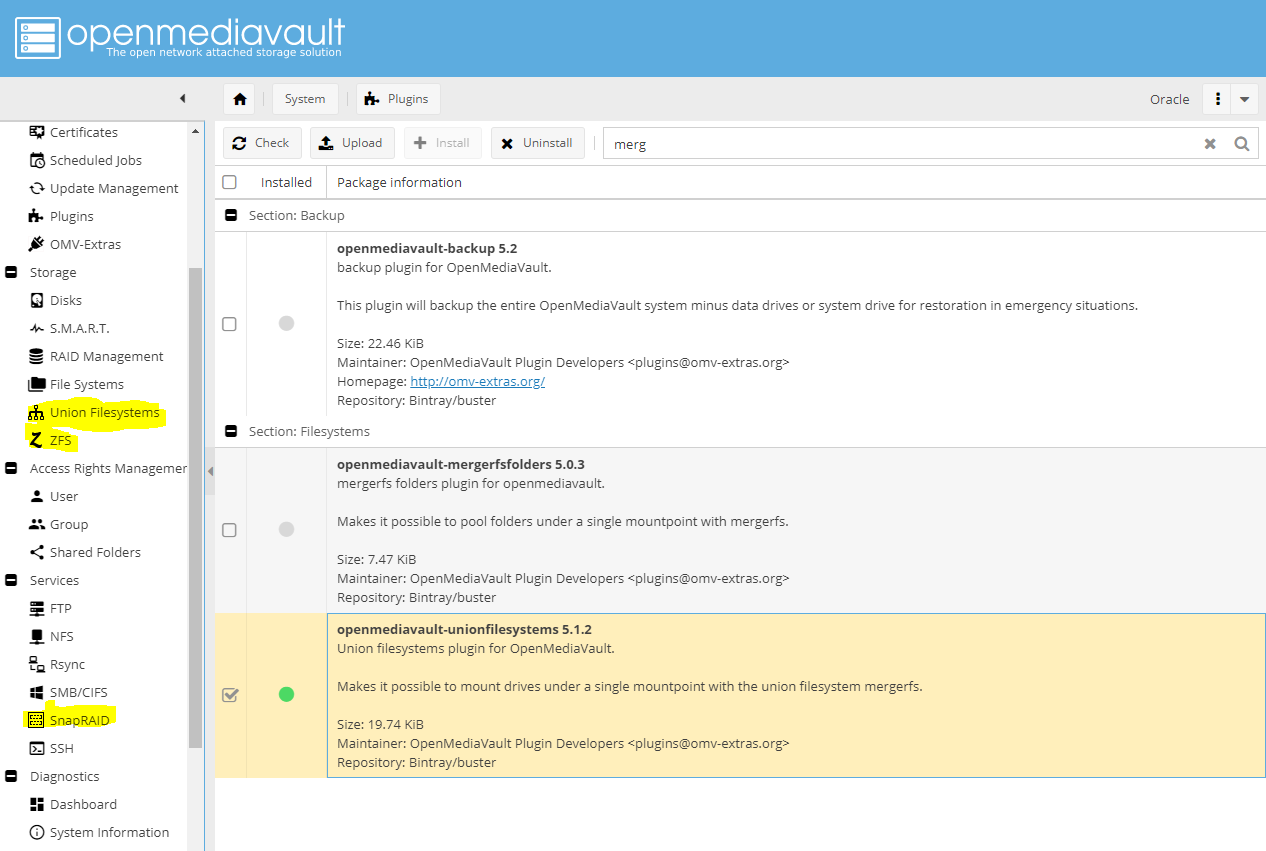 The community plugins I was referring to
Playing with Docker and VMs
With OpenMediaVault fully setup, all my media drives fully functional, the notification and automated test scripts running, it was now time to actually play with the software.
Installing Portainer for the first time I quickly came to love docker, it made container creation and managment an absolute breeze, letting you see the log files and trivially open up a console in the container. It really was a whole knew discovery. That led to the usual download stack often seen around with Transmission-OpenVPN providing both vpn tunnelling and downloading to a bunch of download managers like sonarr, lidarr, radarr, jackett etc.
I also poked a bit into setting up pihole, which worked great except for the fact that I would have preferred using the DHCP server to pass them the DNS server, particularly for devices like the TV. Alas my silly ISP router doesn’t allow custom DNS so it was all just too much of a hassle to setup the internal pihole DHCP server and make it robust to when the server would be turned off.
From there I dove deeper and tested the matlab and mlflow containers, with mixed results (matlab was giving me license issues) and then on to the virtual machines. Nonetheless, playing around both with the default and virtualbox installations I realised I didn’t really need them at the moment.
The Twist
Now that everything was running smoothly and I was playing with virtualisation and docker containers in the network, I took a step back, and decided to sell it!
Surprising maybe, but as I was going through the process of setting it all up and upgrading and running into little issues here and there I realised a couple of things:
- My previous setup was actually quite good already. the basic Synology + Nvidia Shield is an extremely powerful Plex setup, with hardware transcoding built in meaning there was actually no performance difference (the server cannot use hardware transcoding sadly)
- The server was quite a bit louder. Its not very significant, but I like being able to have the flexibility of placing my setup where needed, without having to consider fan noises, and the previous NAS was damn near silent compared.
- Power consumption was also dubious, and possibly higher. I soon realised the Gen8 Microserver was pulling anywhere between 35W idle to 60W when just cruising along; when completely turned off, the iLO system was still pulling 5W! In comparison, the NAS was pulling 11W at idle to 35W when pushed, with the Shield pulling 1.5W to 5.5W in the same situation.
- I took a long hard look at myself and my hoarding tendencies and realised I wanted to try to minimize the clutter in my life, and downsize everything, and since I wasn’t going to sell my Pi or Nvidia shield, the server was gonna go.
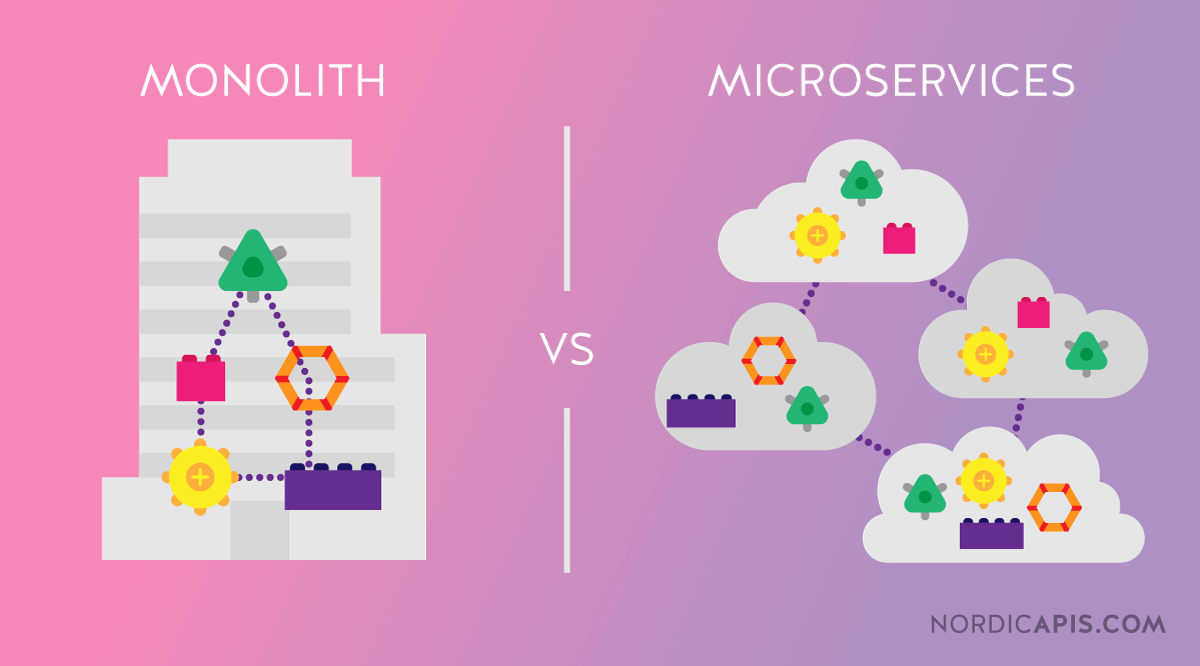 Monolithic vs Microservices is an eternal debate in all industries
This meant I came to the conclusion, that whilst I initially thought that I wanted a monolithic server setup with a powerful, always-on device to do everything, it was going to be louder, bulkier and more power hungry than a completely decentralised setup. So with the lessons learned from this whole debacle I set forth with my ‘network goals’:
- Synology or similar NAS with docker capabilities to serve files and host the download stack (transmission, sonarr, radarr, jackett, openvpn).
- Raspberry Pi with Pi-hole Ad blocking and cron jobs, Wake-On-Lan scripts, VPN server to handle 24/7 management and external access to my network.
- Nvidia Shield to act as a Plex server (if it works so well why change)
- Intel NUC or other Ultra Small Form Factor PC to be a heavy lifting virtualisation and docker container for specific routine tasks and experiments with cloud computing pipelines, such as Computer Vision processing and other things which wouldn’t run well on the NAS or Raspi.
I hope this would give me some strong granularity of power use/noise, whilst still having 24/7 access to the network. It would still be as compact overall as having the Gen8, with more flexibility in positioning around the room, and easier transport.
So I sold the server, however the whole process of setting it up was highly educational and taught me exactly what I want out of my homelab/network, and even after the upgrades, I still made a tidy £120 profit!
Current setup
As it stands, the Raspberry Pi 3B is running DietOS with pihole and docker on it. The pi-hole additionally handles the DHCP for my whole network its on 24/7 and replaces the ISP router’s terrible DHCP service.
The NAS folders are mounted through both Samba for the media files, and NFS for the configuration files (needed to solve issues with file locks). The docker runs the full download stack mentioned before, which it slightly struggles with but as long as I don’t prod it too much it stays up.personally
The NAS is still my current DS214play which sadly just barely misses the opportunity of using docker (as it is one of the last enclosures released with 32-bit intel chips), so I am waiting for the upgrade at some point soon once the 18 series drop in price a bit more.
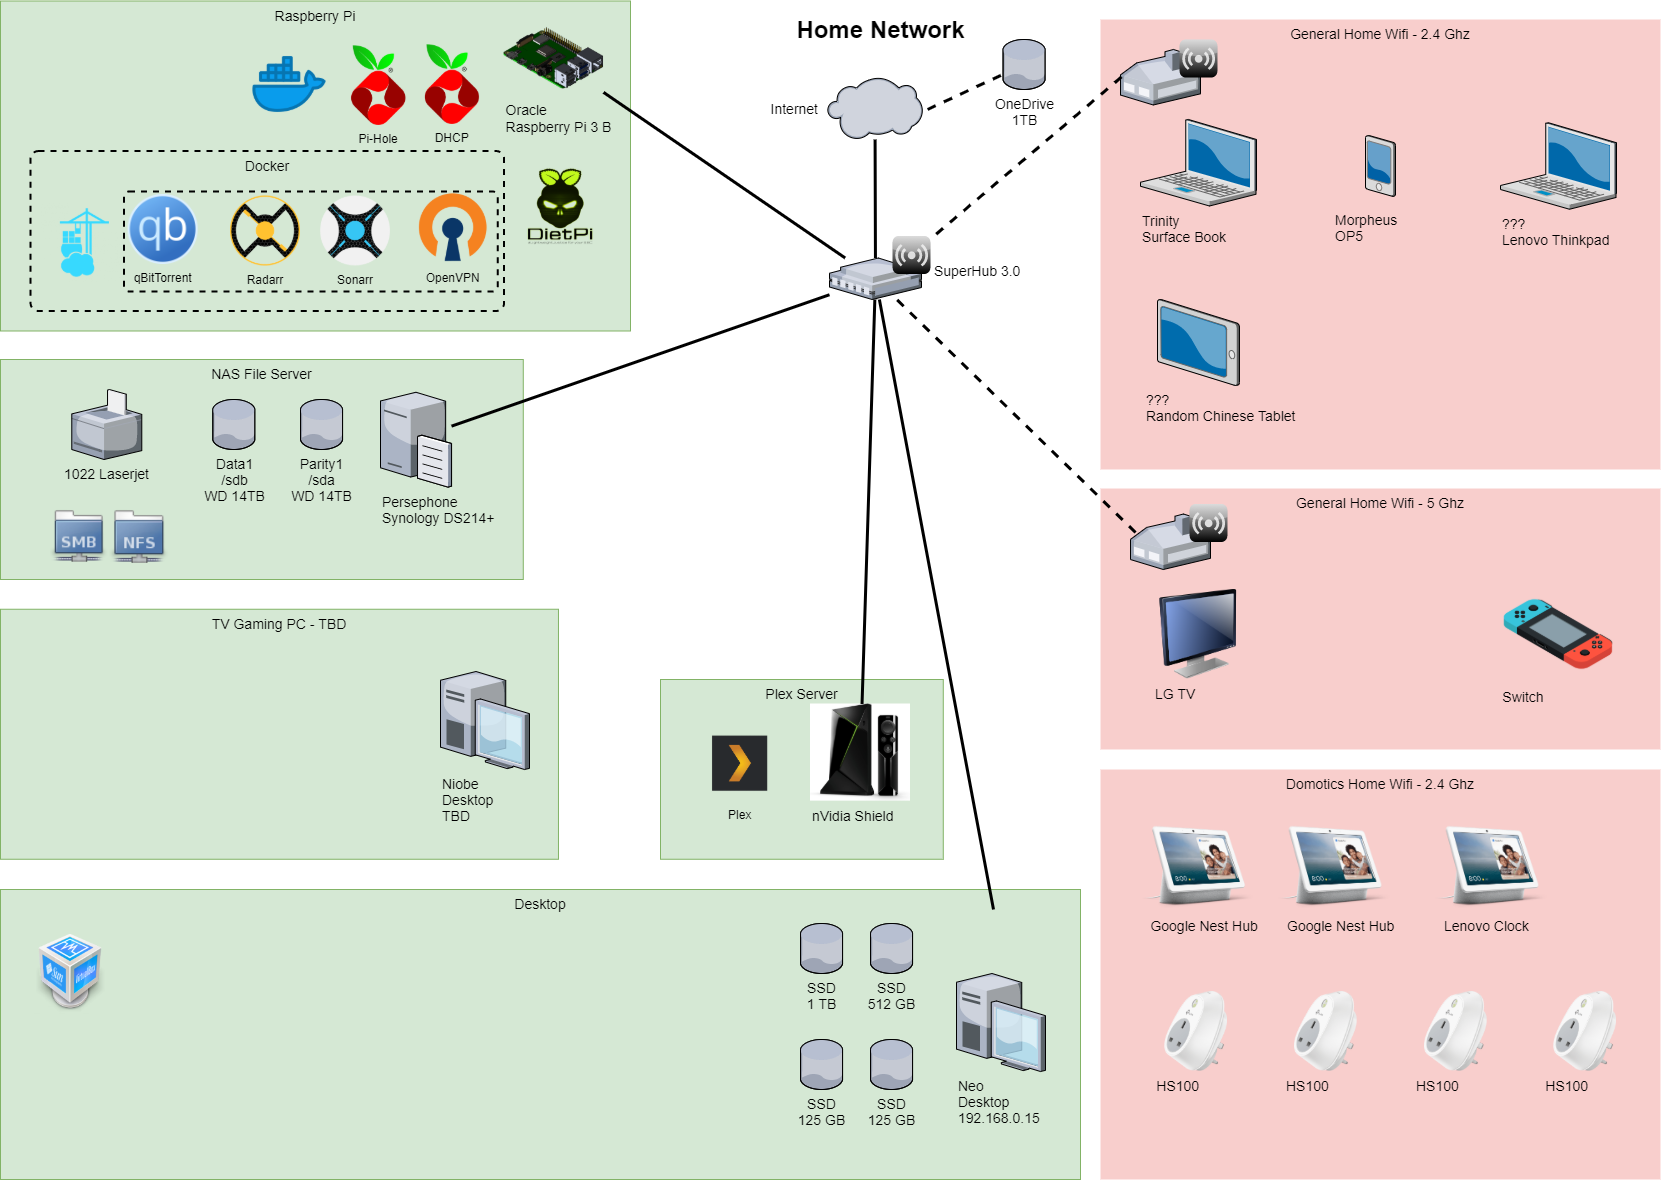 My Network as it stands today
Conclusion
This whole thing was a bit of a wild ride and a lot of time was put into playing with these systems, but now I am much more knowledgeable on both the tools used (docker, bash, ssh, GRUB, basic network security, file permissions, etc) and how I want my setup to look like in the future. I could have written a lot, lot more but this time I actually have this one well documented in my projects folder, in case I ever attempt a new network topology again (I admit the HP microserver Gen10+ is looking very reasonable lately…).
All in all, a fun little couple of weeks!
Credit and Further links
- How to fix your GRUB if it doesn’t boot into linux
- Free Hard Disk Sentinel for testing harddrives
- List of Awesome selfhosted software
- /r/homelab’s wiki with many helpful tips and ideas
- /r/homelab’s “start here” post
- Perfect Media Server - 2019 Edition
- Fix long terminal outputs to fit in the screen
- Guide to portainer
- DB tech makes great videos on using docker and other selfhosted hardware
- TechnoDadLife also has fantastic videos, between both, there’s nothing they don’t cover of OpenMediaVault
Copyright © 2023 Pandalism